Raytracing is pretty hip these days. Whether you’re making an animated film or looking for features to promote your new graphics cards, tracing some Rs is one of the best ways to simulate shadows and reflections with almost perfect accuracy. Raytracing is also, of course, very computationally taxing, hence the new graphics cards. In fact this is so well known that there’s a very old haiku about it that I just made up right now.
Raytracing is hard
It takes lots of processing
Use the GPU
Now, imagine that instead of using the GPU to run raytracing with purpose built hardware and low level optimizations, we built a simple raytracing engine that runs in your browser at a speed I would comfortably call “not real-time”. I’ve done some work with raycasting in the past, casting rays in 2D to determine distance, but that was pretty inefficient. Traditional raycasting and raytracing rely on picking a bunch of angles to shoot our rays and then walking them forward by a specified “step-amount” until they’re determined to have collided with an object. This is fine on a small scale, but as soon as objects move farther away from the camera you will find your rays stepping hundreds or thousands of times, testing for collisions with every object on each step. All of this means one thing: major slowdown. You can try making the step-size larger so you’ll have to take less of them, but then you can step right over the edge of an object without even realizing it.
One day, as I’m sure many of you have found yourself, I was watching a youtube video about something called ray marching, and I decided that this would be the perfect way for me to implement raytracing in a much more efficient way (I later learned that this is how almost everyone has does raytracing for the longest time which makes sense). Ray marching is much more computationally efficient because rather than stepping by a set distance every time, the ray marches the farthest distance that it can while being sure it won’t collide with any objects. The key piece of math to ray marching is signed distance functions. A signed distance function differs from a regular distance function in that it returns a distance to the surface of the object, rather than the center of it. It’s signed because the value is negative if it’s inside the shape and positive moving outward from the surface. The easiest one is a sphere, it’s just the regular distance to the center of the sphere minus its radius. The signed distance functions for many other common 3D shapes are slightly more complicated but they’re nothing to be worried about and you can just find them online if you’d rather not derive them yourself.
On each step of the ray, you calculate the signed distances from the tip of the ray to every object in the scene (which is not that bad computationally because you usually won’t have too many objects and if you do then you just can create some kind of spatial partitioning system). You then find the shortest value out of these distances because that’s the maximum distance the ray can travel to guarantee it won’t end up inside an object. You step the ray forward by that distance and repeat the process from its new position. This is a mathematically perfect model in the sense that if an object is curved then you’ll never technically collide with it because you’ll just keep moving shorter and shorter distances. The solution to this is just to pick an arbitrary cutoff point where you can consider the ray to have collided and you can stop recursing. That whole explanation was a little wordy, so you might prefer this haiku.
Find all distances
Then step by the shortest one
Now read this again
So that’s how ray marching works, but how do we use this to render an image? Call me the weird bookshelf place from the end of Interstellar, because it’s vector time! My first step was to define some objects. The whole project is built around one little Vec[tor] class that defines a point in 3D space. This gave me a way to represent the position of an object, so I could then build classes to represent spheres, cubes, and planes with their respective signed distance functions. I also defined a camera as a point positioned a set distance away from the scene. To render the scene, this camera object shoots out one ray from its position at a negative Z directed toward each pixel of the canvas in the XY plane. This ray returns an object that it collides with so we know what color to draw that pixel of the screen.
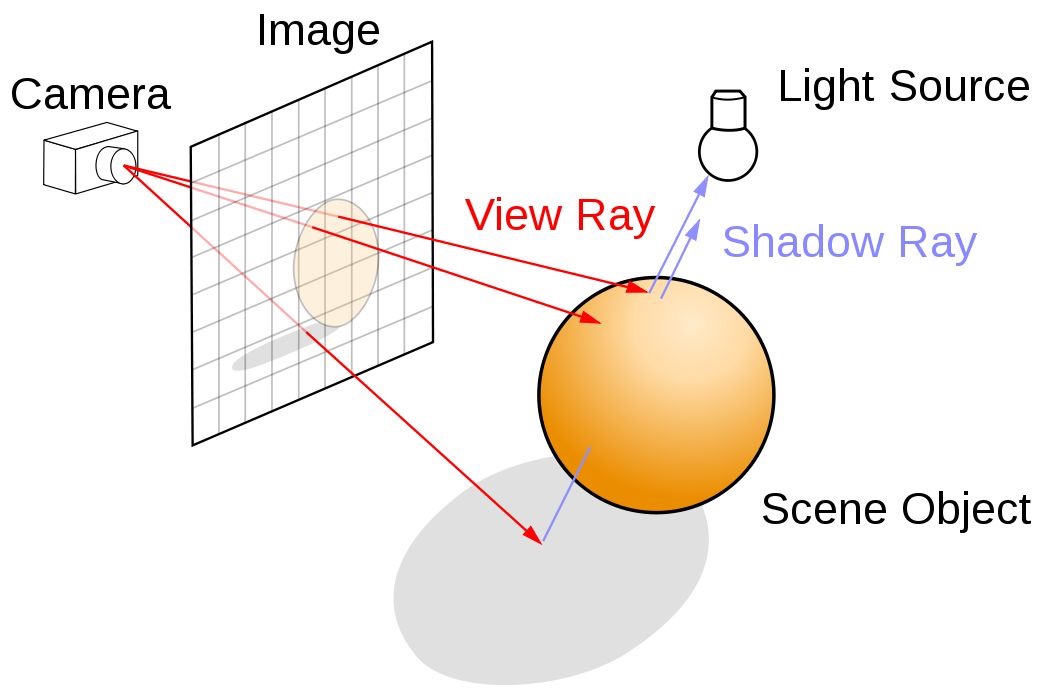
Photo courtesy of Nvidia, https://developer.nvidia.com/discover/ray-tracing
We set a maximum length that a ray is allowed to travel before we cut it off and conclude that it is heading off into the sky forever. The canvas I used was 600x600 pixels which means to create an image we need to cast exactly 360,000 rays.
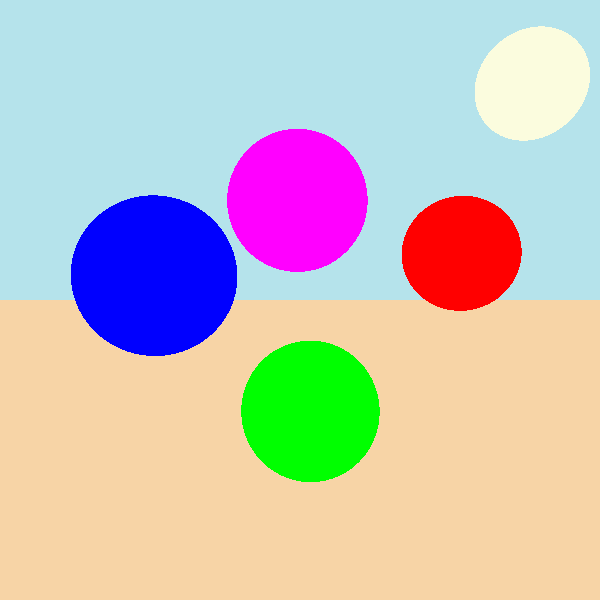
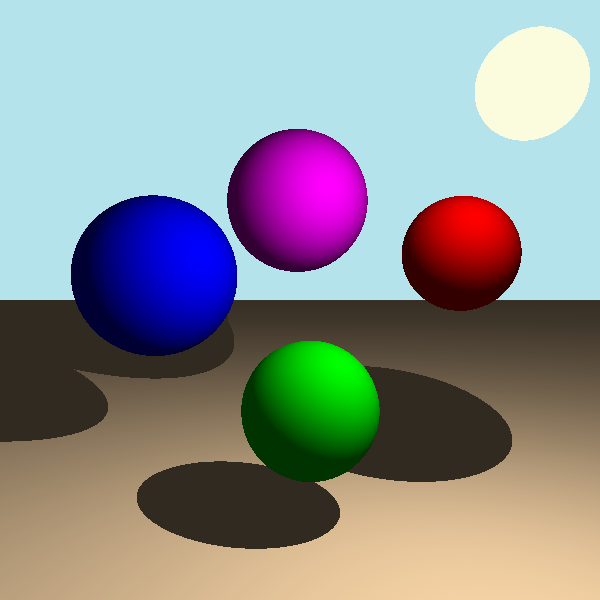
Let’s see what that image looks like… oh, well it’s completely unshaded, we’ll have to do something about that. The first and easiest thing we can do is to add shadows. We first define an array of objects that are designated as light sources and then every time a ray collides with an object (not the sky) we cast out rays from the point of contact towards every light in that array. If that array collides with the light that we cast it towards then we know its path was unobstructed. If the ray returns that it collided with something that wasn’t a light then we know the path is blocked and we can add some dark shading on top of that pixel. If we assume that there’s only one light source, this means we need to cast an additional ray for every pixel that shows an object. Given that about half of the picture is sky, we need to cast an additional 180,000 or so rays to add shadows. If we add another light source that number doubles to 360,000 and so on. For this example let’s say we stick to just one light source which brings our current total to about 540,000 rays that need to be cast.
By now it should be incredibly apparent why we need our ray marching algorithm to be efficient. Imagine trying to render this for a game 60 times every second. This is already getting difficult to run in the browser and I’ve talked it up a good bit, so let’s see what our image looks like now.
Better, but still underwhelming. We have absolute shading for shadows, but we really need some diffuse shading so our sphere’s look more spherical and less circular. Diffuse shading occurs when light bounces off tiny imperfections in the surface of an object and is scattered in all directions, making it appear matte and not reflective. The amount of light that hits a certain point on an object changes based on its spatial relationship with the light source. A guy named Johann Heinrich Lambert came up with something we now call Lambert's cosine law back in the 1760s. This picture from scratchapixel explains it really well (and a lot of other raytracing stuff so I’d check it out).
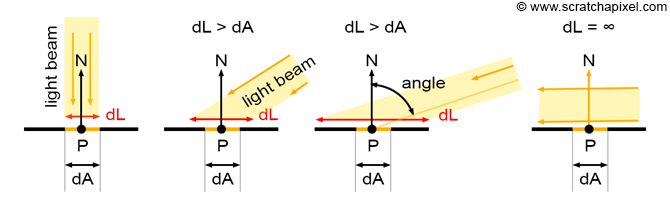
Photo courtesy of scratchapixel, https://www.scratchapixel.com/lessons/3d-basic-rendering/introduction-to-shading/
As the angle between the light and the surface increases, the same amount of light is spread over a larger area which makes it appear darker. Lambert's cosine law states that the proportion of the total light received is modelled by the cosine of the angle between the normal vector from the surface of the object and a vector from the surface pointing to the light source. By making these both unit vectors, we can calculate the dot product to easily find the cosine of the angle between them and thus the proportion of the light’s total brightness that makes it to a given point. This is super simple to implement and it makes things look way better with only a marginal increase in processing time because we don’t actually have to cast any new rays.
It was also around this time that I added cubes! These were pretty easy, it was just slightly more complicated to create normal vectors for them than it was for spheres. That is really not a lot of information so I’ll stretch it out with another haiku.
Hey, you’ve heard of cubes?
Basically a 3D square
Well, I added them
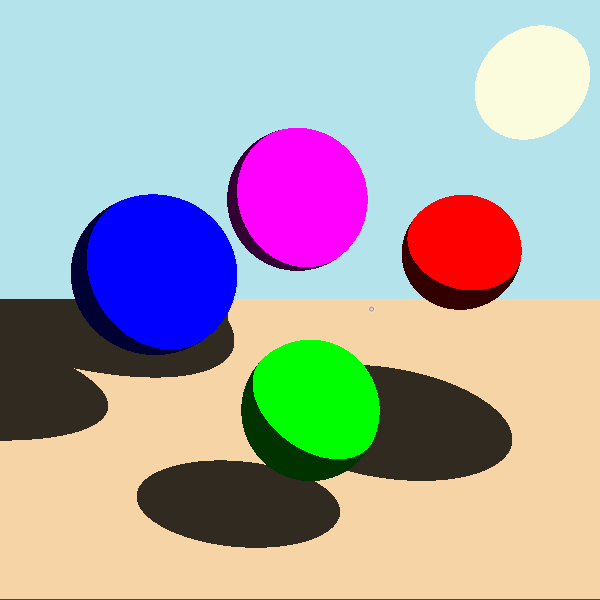
Let’s take a second to talk about light sources. I previously said that the diffuse shading determined the proportion of total light that reaches a specific location but what did I mean by total light? All the light sources have a defined intensity value, let’s say 1000 for the sake of this example. Objects directly next to this light source would be shaded as having some proportion of that 1000 based on their angle relative to the light. For example, positions directly facing the light would get 1000 and something at a slight angle might get 800. But this value doesn’t stay as 1000 everywhere in the scene, the maximum amount of light that a position in 3D space can receive falls off with the inverse-square law. As you move farther away from the light source the points directly facing the light will become darker and the sloped bits will continue to receive the same proportion of that smaller amount of light. A bit away from the light the position directly facing it would get 700 and the sloped section would get 560. This was again, very easy to implement and it didn’t add any more rays so it didn’t affect compute time too much. Let’s check it out!
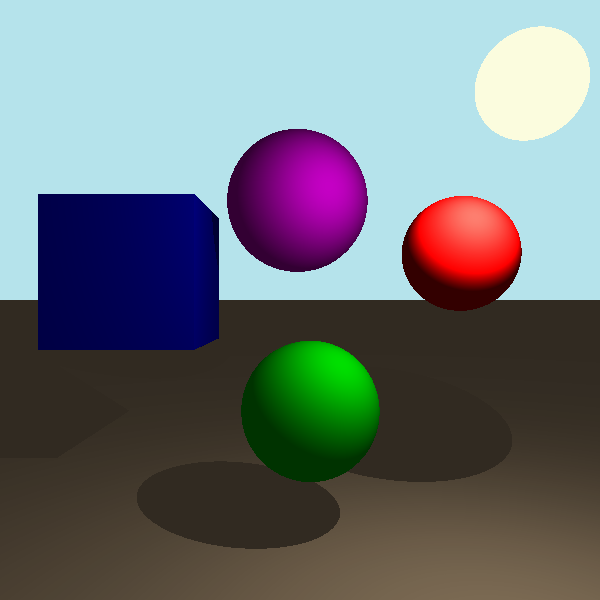
I know this pretty much just looks darker, but trust me it's more accurate (check out that highlight)
Wowzers, this is getting long, but I’ve just got one more feature I want to talk about. It’s really the real reason most people care about raytracing in the first place: dope-lookin’ reflections. We’ll implement this by again calling on our good friend recursion. We give all objects in the scene a boolean property to determine whether they’re reflective or not. When we are rendering the scene and a ray collides with an object we can check if that object is reflective. If it is then we can calculate a reflected ray by just reversing the aspect of the collided ray that is parallel to the normal vector. That’s a confusing sentence so here’s another helpful picture from scratchapixel.
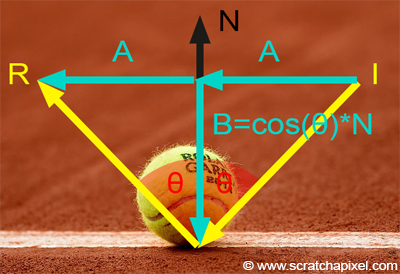
Photo courtesy of scratchapixel, https://www.scratchapixel.com/lessons/3d-basic-rendering/introduction-to-shading/
We’re not limited to doing this just once, the rays continue to reflect off of different objects until they either go off into the sky or reach our set depth-limit. When the ray finally stops all of the colors from the objects it has collided with are combined in a weighted average with the objects further down the stack appearing less prominently in the averaged color. There are many approaches that have gotten good at simulating incredibly accurate reflections, but raytracing can create them perfectly (which is difficult on round objects normally) and you can go to a depth of reflections within reflections that is pretty hard to match with any other method.

Max reflection depth: 1
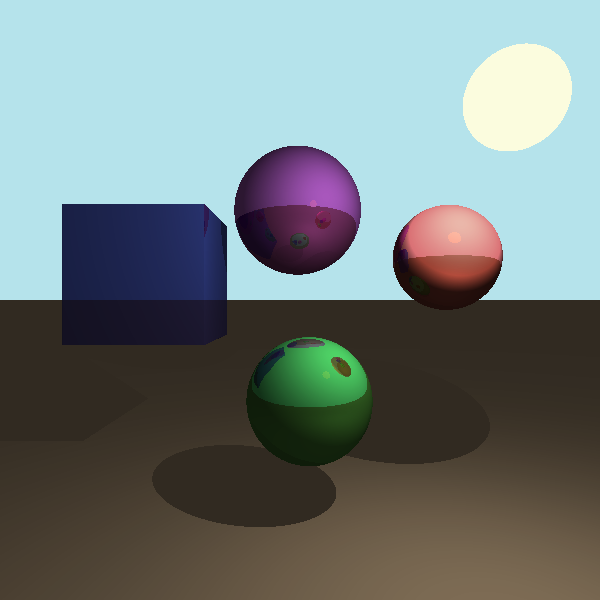
Max reflection depth: 6
Implementing this adds a significant load to the processor because we now have to cast many more rays. If we make every object in the scene except the ground reflective then we add an additional ray for every pixel of the screen that has an object, plus some more for reflections within reflections. This is harder to get an exact number for so let’s estimate around another 140,000 rays for this scenario bringing our total to 680,000 rays that need to be cast.
That is all of the features I implemented but if you decide to make your own raytracing engine, another common feature to include is refraction. I didn’t end up doing this because I didn’t want to add transparent objects to my system but you totally should because it looks cool. I am pretty happy with the system I was able to create mainly because it should be very easy to add more shapes and features in the future if I so desire. There’s also a lot of constants used in the rendering process as well that can be tweaked to drastically alter how things look and are shaded. As always, adding all the menus and interactive features took almost as long as the project itself but I’m certainly getting faster.
I don’t know if there’s that much more I can say about raytracing given that I’ve already written over 2000 words, and I frankly think this time would have been better spent writing my english essay. I appreciate that you read this far and got to see my last project that isn’t going to be fully up-to-date with ES6 standards (heck yeah arrow functions!) Now, I will leave you with one final haiku.
Bazinga! That’s long
Coding this took much less time
Thank you for reading